May 30, 2009

People who aren't me show you how they watercolor!

I have to attend a funeral this weekend, so this entry is made up a couple real gems that I've been saving for a rainy day.

There are a few illustrators whose blogs I'd follow just for their so-good-I-sometimes-want-to-cut-my-drawing-hand-off-and-mail-it-to-them-as-tribute art, but I have a special place in my heart for the illustrators that take the time to talk about their experience making art. Jillian Tamaki doesn't write very much on her blog, but when she does she often has something useful to say about what it takes to be an illustrator.

Recently illustrator Quentin Blake got a website, and I heard about it on Jillian's blog. You all know Quentin's work, even if, like I didn't, you don't recognize his name immediately. His wiggly line is what you picture when you imagine a Roald Dahl book. He illustrated Matilda, B.F.G., Willy Wonka, and literally hundreds of other children's books.

And on Quentin's site is a very well-produced TEN MINUTE video of Quentin walking you through his well-honed working process from beginning to end. Look at this still image! This is what I wish Comic Tools COULD be, video-documenting masters using their tools and explaining their process:

It Looks like one of my process photos, right?!

Just for posting this link to alert us of it's existence we all owe Jillian a kidney. But she went further than that, and she talked about some of Quentin's work habits and what makes them as effective as they are, and how they apply to everyone who makes art professionally:

A few things I thought were really interesting about the video:

1. While inking the final image on the light-table (with what looks like an upside down nib?), he is NOT tracing. He is redrawing using the underlying image as a rough guide. Nathan Fox spoke a bit about this when he visited my class a few weeks ago, as he inked over a very loose drawing. I think it's really important you CONCENTRATE when you're drawing and stay very cognizant about what you are doing. You should never be on "autopilot" when you are drawing.

2. Please observe that he will often do a piece several times. I do this too. If something isn't working, sometimes the best thing to do is to throw it away and start over. This is particularly important if "freshness" and "simplicity" is a vital aspect of your work. In many ways, "simple" is the hardest thing to do because you have nowhere to hide.

3. I have noticed that many students do not like doing sketches. Quentin Blake's work looks so free and loose, but please note the amount of planning and roughs behind his pictures. The fact is that illustrators are collaborators and sketches are the way we communicate with designers, art directors, editors, or whoever we're working with. Part of your process development should be finding a way to fulfill this step while still keeping things interesting and fresh for the final stage.


And if that wasn't enough talent on video for you, here's Lucy Knisely doing a portrait of the cast of "The Nanny,", from beginning to end, in real time, explaining as she goes. It's around three hours of a great cartoonist doing her thing.

May 24, 2009

This week: Neck Muscles (and also hand resources)


It's not hard to see why the neck freaks so many people out. You look at it with the skin on and it's hard to see what's going on. Then you look at an anatomy diagram and you see what looks like dozens of tiny muscles in layers crisscrossing every which way, and you like eating the end of a shotgun.

The problem with looking at an anatomy text to see what's going on with the neck is that anatomy texts are there to each you anatomy, but they aren't prioritized for the artist, who more than likely just wants to know what muscle they're looking at, or trying to get those slanty lines in the neck right.

To actually draw a neck, any neck, you only need to know five muscles.

You heard me. Five. (Technically nine, but the first four are symmetrical, and if you can draw them on one side you can draw them on the other, just like if you can draw a left arm you can draw a right arm.)

If you're drawing more than five visible neck muscles, you're not drawing a human being. Seriously. ("But Matt, what about when I flex my neck and make all those muscles pop out? There's more than five of those!" No there actually aren't, but I'll explain later why it looks like there is.)

Five muscles. Here we go:

First, here's our plain skeleton. You'll note he has ears, and dots behind his ears (not on the jawbone, but in this drawing the jawbone covers up where they'd actually be.) Those are there to show where some of the muscles insert.
That tube in back of the muscles in the picture below is your windpipe. The cartilage of the trachea is larger and sticks out more in men than in women, although there are freakish examples like Ann Coulter. (No matter what I say, I cannot convince my mother that she actually is, and has always been, a biological woman.)

First two muscles: Sternohyoid comes up from the sternum and inserts in front of the trachea. Omohyoid comes from the bend 2/3rds out on the collar bone, attaches to the top rib, and then comes up and attaches in front of the trachea. These muscles are often mostly invisible, but they become prominent in very skinny people or in times of stress, anger, and fear.
3rd and 4th muscles: you all recognise trapezius, right? Trapezius covers up a looooooooooot of muscles underneath it, making them pretty much invisible and making this lesson much shorter. Also, see how there's not really anything in front of either side of it? That gap that's left is actually a prominent feature of the neck and shoulder area, and you can actually see it in all the photos below that accompany the illustrations. The muscle that has two forks coming up from the sternumm and collar bone and reaching up behind the ear is sternocleidomastoid (say that 3 times fast), the most prominent and most often mis-drawn muscle when people draw necks. A lot of folks draw a slanty line in the neck not knowing where it comes from or where it's going to.
Here's a good picture of the sternocleidomastoids from the side:

Here's what they all look like layered together.
In this fetching photo of my friend Hilary Florido, you can see all of these muscles clearly. Look closely and you can actually see where her omohyoid muscle bends into her top rib: Looks like Trixie from Speed Racer, doesn't she?

The fifth and last muscles you need to know to draw the neck is platysma, a thin muscle that makes up the front of your neck. It's the muscle that sticks out and makes all those strainy lines when you try to make your "neck muscles" pop out. What looks like a lot of muscles is actually just the fibers of this one muscle.

Try not to overuse this one superhero artists, okay? Pay attention and you'll notice that even if you're straining or yelling you don't flex this muscle very often at all. Only in certain kinds of grimaces and yells.
Here's someone flexing their platysma: Also for the superhero folk, note that platysma lays on either side of the trachia but not actually over it, and that it DOES NOT CIRCLE ALL THE WAY AROUND THE NECK, no matter what Rob Liefeld says. See how it only goes back so far? Yeah, keep that in mind, will you, superhero artists drawing necks?

You'd think that the neck muscles would stick out more in musclebound folk, but the opposite is actually the case: skinny people tend to have strand-like, very clear neck muscles whereas bulk tens to obscure them, as in this example: Looks like he's hiding a pineapple in there, doesn't he?

Okay, now, in the comments section a reader was begging me for a hand tutorial.

But there's no point in me doing one, because MAD cartoonist Tom Richmond already did a tutorial on hands that's better than the one I might have done by like a million billion times.

Tom has several other really intensive tutorials on his site, which can all be found at this link: http://www.tomrichmond.com/blog/tag/tutorial/ I'm gonna make that link a part of this blog's sidebar, too, it's such a great resource.

This is the last of my entries on anatomy for cartoonists, and I leave you with some hands drawn by Farel Darymple, who draws some of my favorite hands of anybody, ever: (click on them to read the comic they're from)


Next week: I'll actually be away at a funeral, but I have something up my sleeve that I've been saving for a rainy day.

May 21, 2009

Matt Madden and Jessica Abel's pre-MOCCA comic making class

From Matt's blog:

"Starting the day after Memorial Day, Jessica and I are offering an intensive 2-week class at SVA, the goal of which is to learn how to make comics by writing, drawing, and printing a minicomic in time for the MoCCA Art Festival the weekend of June 6-7. We'll teach in the mornings and afternoons will alternate between open studio time and visits from a group of stellar guest cartoonists: David Mazzucchelli, Becky Cloonan, Tom Hart, Gary Panter, and Kim Deitch! Each will have a three hour session that will be a combination workshop/craft talk/crit.

The roster's filling up fast so sign up sooner rather than later. Info below, registration info here.

Summer Intensive Comics Workshop

CIC-3012-A
Mon.–Fri., May 26–June 5
(begins Tuesday, May 26)
Instructional Hours: Mon.—Fri., 10:00 am–5:00 pm
Studio Hours: Mon.–Fri., 5:00 pm–10:00 pm;
Sat., May 30, 9:00 am–10:00 pm
9 sessions; 6 CEUs; $950

Comics, graphic novels, manga: it seems everyone wants to be a cartoonist these days. Yet comics is a complex medium that requires a grasp of drawing and storytelling as well as an understanding of the various tools and technology to prepare artwork for print. A great way to learn how to make comics is to jump in and make a short, printed comic in only two weeks. This intensive comics workshop is geared toward those intrepid students ready to make the plunge. In daily sessions, we will guide students through the process of making a comic, by presenting activities and short assignments on the basics of cartooning and storytelling as well as advanced topics like inking and reproduction. In addition, several afternoons will feature lectures and critiques with visiting professional cartoonists. The workshop will also include participation in the annual art festival of the Museum of Comic and Cartoon Art (MoCCA) held June 6–7; students will have the opportunity to sell and trade their comics at the premier gathering of independent comic artists and small publishers, literally the day after their comics are finished."

May 17, 2009

This week: Leg Muscles

If for this week's post about the legs I had done nothing but write "The femurs tilt in.", I'd have still improved the figure drawing of many people reading this immeasurably. Drawing the legs as two straight lines coming down from the torso has led to more frustration than just about anything except maybe feet and hands for just about every cartoonist. Drawing the legs straight when you stick-figure in your figure works for standing poses okay, assuming your figure is really cartoony or is wearing pants. But when you try to make that figure run, or get into an odd pose, things get pretty hairy and you start doing that re-draw-it-20-times-and-it-still-looks-funny thing. God help you if you tried drawing realistic muscles on a figure using straight legs as the basic shapes. It looks lumpy and wrong and you sink into confusion, frustration, drinking and suicide.
This week, I'll show you what's going on inside the legs, and what gives them that weird effect where they seem to form a straight line and yet aren't straight at all.
Let's start with the bones. Here's the pelvis we learned how to draw, remember? Now, pick where your knees are gonna go for your character. in a stock-straight standing position they'll be under those loops of bone at the bottom of the pelvis called the ischiums. The knees are pretty thick, so draw something thick where the end of the knee bone's gonna be. In this position the feet will come below those, so mark them off. These 3 points, the ischiums, the knees, and the feet, form the "straight" line of the leg, and are what make all the crazy curves the leg takes seem straight while being very obviously curved. The leg does NOT form a straight line from the hip joints, like you might think.
Now, to get the angle of the femur, draw your dots representing the greater trochanters, which is where your femur stops going slant-ways out from the joint and heads down. (draw them somewhere wider than the pelvis is wide and somewhere in the neighborhood of the ischiums in height.) Then draw a line from there to the INSIDE of the knee. Now you have your slant.
Now draw slightly bowed-out lines from the inside of the knee down to the foot dots. These are actually too curved, I'm exaggerating a bit for effect. (although I like to curve them when drawing a figure because it makes the shape of the lower leg easier to draw)
Now that's all you really need if you're just using these as guidelines for your figure drawing, but if you want to make bones, add the crested caps to the bend in the femurs (important for muscle attachment) and fill in the tibia at he knee joint. It should be about as wide as the corresponding part of the femur above.
Now fill in the fibulas under the overhang of the tibias, and fill out the femurs, and change your dots into heel bones. Now you have bones!
Now, the curves the bones take can seem pretty crazy, and it's hard to see how they come out to looking like a straight leg. When you draw a leg wrong with straight bones and then try to add muscles the muscles bulge out horribly. But when you draw muscles into the spaces of the crooked looking leg bones of a real skeleton they even everything out and make it appear straight and natural.

First, we start with the bones: (click on these to see them larger)
Deep in your legs, coming from the ischiums, is a sort of fan of muscles that attaches up the entire inside length of the femur. (There are a LOT more than this, but unless you're drawing very realistic groins you only need to know these as a packet of muscles to get the shape of the leg right.) It's amazing how much more leg-like the skeleton gets just adding these isn't it?
The next layer of muscles:

Front- Vastus lateralis on the outside and vastus medialis on the inside are the two quad muscles that make muscle men's legs seem creepy and lumpy above the knee. Nomuscles pass through the knee, only tendons of muscles, and so muscle bulges around the joint while the joint stays looking pretty much the same. They attach on the greater trochanter.

Back- Semi Tendinosus on the inside and Biceps femoris on the outside form the two muscles whose tendons shape the back of your knee and the back of the thigh. See how just with them there it looks like an almost complete knee joint? There you go. They originate from the ischiums, pass as tendon over the the back sides of the knee and then insert below the joint. These muscles act like the bicep muscle in your arm, bending the knee. It even has two parts just like the biceps. Hmm.
Next layer:

Front- Completing the quad muscles and the front of the thigh muscles are rectus femoris and satorius. They both come from the crest of the pelvis. Rectus femoris keeps the other two quad muscles visually separate and turns into the huge tendon that houses your patella (knee cap) and goes down over the front of the knee joint, basically defining the shape of the entire front of the knee joint. Satorius curves around the quad packet and curves along the inside of the knee, adding a little curve where you'd otherwise see bone. For clarity I colored it red as it passes down the side of the knee, but in fact it turns to tendon as it passes over the knee like everything else. The quads act a lot like the triceps muscle in your arm, straightening the leg out or pulling it up from the hip. Also, it has a huge tendon like the triceps and has 3 parts like the triceps. Hmm.

Back: Gluteus maximus, your famous butt muscle. It originates on the pelvis along the iliac crest of the spine, all the way back and down the tailbone, and inserts along the back of the femur. How far? Well, I made this drawing extra see through so you could see the bones underneath. The gluteus maximus should totally cover the ischiums as it slants down to meet the femur.
Now the lower legs:

Front- over your fibula and on the side you have a bunch of tendons that operate the foot,, toes and ankles. No need to go into them, just think of them as a packet of muscle giving shape to that part of the leg.

Back- The calf muscle is two lobes that come from both sides of the knee joint, adding shape to the back of the knee, then down where they swell out, the inside lobe being thicker and lower, and then tapering into a single, powerful tendon called Achilles tendon that attaches to your heel bone to draw the foot back, like if you were to stand on tip-toe.


Here's what the front and back muscles look like with all the muscles filled in:
Looks like a leg now, right? One more thing to note while drawing the leg using bones, the leg has a lot more mass in back of the femur than in front of it. Much like with the arm, the quads/triceps aren't quite as massy and thick as the biceps/back of the legs.

Well there you have it, the leg!

Next week: The final part of these anatomy lessons, where I address the neck and other odds and ends I haven't touched on yet.

May 10, 2009

This week: The forearm

The forearm is an awful thing for the cartoonist who never learned anatomy really well and one day decides they want to draw an arm realistically. It's awful because it looks kind of okay almost no matter how wrong you get it. Unlike the back or upper arms, which look anywhere from awkward to painfully deformed if you don't know what you're doing, you can literally draw everything n the exact opposite place of where it's supposed to be in the forearms and still have it come out looking okay enough you might never know it was wrong.

Which, um, is kind of what I used to do. More recently than I'd care to admit.

I used to often draw my arms this way:

By the end of this lesson you'll see why those are all totally wrong, if you can't tell already.

So, the reason I never learned the forearm for so long was ,it just looks fucking complicated, doesn't it? All these tiny muscles and tendons going this way and that, who can remember all those?

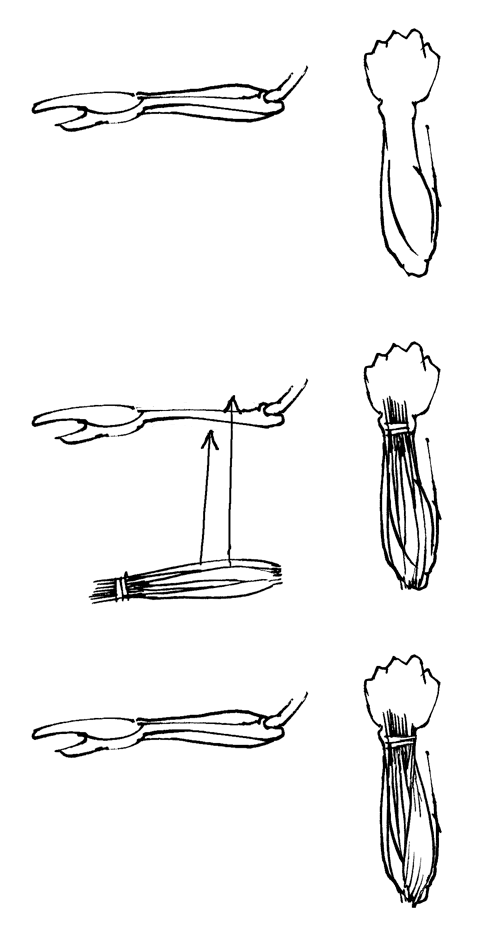
Well, you don't actually have to know them all, unless you're planning on drawing a character with no skin in a realistic style. All you really need to know are 2 muscles (which you draw as one most of the time) and that the skin sticks close to the Ulna, and that's it.

Here's the two muscles you need to know:

You don't need to know their names, although I'll tell you that 1 is your extensor carpi radialis longus, and 2 is your brachioradialis. They make up that bulge of flesh that slants across your arm and elbow and pretty much defines the from of your whole arm from over the elbow to the wrist.

Here they are in an actual body: Bear in mind they're thin and dehydrated in this plastinated body.

The other structure you need to know is the patch of facsia that holds the skin close to the ulna, which is the arm bone that doesn't rotate around and makes up the pointy part of your elbow and the sticky-out part of your wrist. It looks like this:

This line not only shows where the bone will always be close to the skin (feel on yourself, it runs all the way down), it represents the separation of the packets of muscles that yanks your hand and fingers up or open and the packet that hanks them down or closed.

Those packets can be thought of as just that- two packs that you slip into the arm to fill it out and pretty much forget about unless you're drawing detailed muscle men. Like this: (animated)


The only visible features, even in fairly buff people, is going to be the 3 things I'm teaching you here.

(A note for the Rob Liefeld types, though: the forearm may look complicated, but it does not have an infinite amount of randomly placed muscles arranged like a lumpy teardrop. You have four fingers and a thumb and there are 2 tendons to pull each open and shut, plus a few other tendons that do some other stuff, and that's it. If you can see more than 20 muscles something is seriously wrong with your character. Even on very strong and cut bodybuilders it should really be more like 10 or less visible. And that's assuming someone with NO body fat at all.)

So let's look at how these affect your arm's shape:

First of all, 1 and 2 form a bulge coming from above the elbow on the back of the arm and twisting down to the wrist near the thumb. The bulge gets pretty big and distinctive as the muscles get bent like a garden hose.


On the right you can see the line leading from the elbow to the non-thumb side of the wrist. That's number 3, indicating where the ulna stays close to the skin. If you raise your arm up and bend it you can see the bulge formed by 1 and 2 and the line formed by 3 even better. Note how on the left the line of 1 and 2 twisting over from the back of the arm to the thumb is a different line entirely from the line formed by 3 as it goes from the joint to the bump of the wrist.
On the left you can see how 1 and 2 form the slant of the wrinkle in your elbow. In fact, with the bicep that runs underneath them to connect with the ulna, they form the crook of your elbow. Feel your flexed elbow you you'll feel 1 and 2 on one side of the nook and your bicep on the other.

On the right, you can see how 1 and 2 twist as you turn your palm down.
Here you can see how 1 and 2 form the often confusing shape of the back of the elbow. The elbow, when the erm is extended, is defined by the bulge these form as they pass over, to the side, and then down from the elbow joint. The elbow joint itself is just a knob tha pokes out- all the complexity of the shadows of the elbow comes from these (and sometimes other) muscles running around it.

Note on the right how 3 forms a strong line when the arm is twisted, causing the flesh to twist and bulge over the close-to-the-skin bone.
My forearm is one of the only parts of me that's very well developed at all, so here are some photos I took to show you how these things look outside of a drawing:


If you understand these 3 defining features, you can draw very accurate and natural looking forearms on characters of any muscle mass or build. These features are visible on the very fat and very thin, and they look almost identical on all body types, on men and women. Draw them large to make someone seem brawny, make the bulges bulgier but the forms more obscured for a fat person, make all the shapes delicate and don't draw almost any internal lines for a wispy person.

Now go back to the top and look at those arms I used to draw again. Yeah, NOW you see it.

Next week: The legs

May 3, 2009

This week: Upper arms and Kirby dots

Drawing from life is an invaluable way to learn about the figure, and especially about variations between different people's bodies. But if you don't know the underlying anatomy, sometimes it can be pretty darn difficult to tell what's going on under there, even on very well-defined models.

Nowhere else have I had this problem so badly as in the arms, and the way those muscles are layered. Yes, like everyone else I could see that the bicep bulges in the middle of the arm and pulls on something below the elbow. Yeah, I could see the pectoral pulls sideways on the humerus somewhere, and the deltoid pulls up on it from somewhere on the shoulder. But the beginnings and ends of some of these muscles are hidden, and my observations of the model actually led me to some pretty severe misunderstandings about how these muscles were arranged, which made things difficult whenever I'd try to draw these muscles from my head.

For instance, take the bicep. I figured it looked kind of like the pistons on the terminator,

attaching somewhere on my humerus and pulling somewhere on my lower arm. It bulges out where the pectoral seems to go in, so I figured the pectoral went under it. But when I'd draw it it never looked right. I was all confused.

So let's clear all this upper arm muscle business up, and sort out what goes over what.

(click the image to see it large. I recommend opening it in a new window so you can look back and forth between it and the text.)

The dots you see in the drawing above indicate the origins and attachment points for the bicep and tricep muscles. I'll start with the bicep side:

The bicep originates at two points on the shoulder blade, and as you can see one of the heads curls up over the top of the humerus. The bicep attaches to your radius, which is the bone that rotates around your ulna and allows you to rotate your hand up and down. I've shown it twisted here to illustrate just that.

The bicep is covered at the top by two muscles, the pectoral and the deltoid. The pectoral muscle crosses over the bicep completely and attaches to the humerus. The front head of the deltoid that comes off the collarbone sweeps over the tippy-top of the bicep and attaches to the humerus about halfway down. Unlike the "Terminator" conception of the bicep I used to have, the bicep doesn't go straight up and down along the arm, but rather makes a diagonal curve from the shoulder, under the pectoral and down the the ulna on the outside of the arm.

The tricep, on the other hand, actually covers a muscle, the latissimus dorsi. (It actually covers more than that, but I'm sticking to the muscles I've taught you.) Latissimus inserts onto the humerus. Tricep originates on the humerus and from a point on the shoulder blade, indicated by the dots in the drawing. Tricep then inserts on the back of the ulna, the stationary bone of your forearm that forms the lower part of the elbow joint.

The back portion of deltoid covers the top of the triceps.

Oh, by the way, tool tip: To make nice, round dots in a comic, you can use a q-tip. Use the whole end, or for smaller dots,

cut off one end and clean up the edge.
This is actually how Jack Kirby made his famous "cosmic energy" Kirby dots.
Next week, the elbow and forearm.

May 2, 2009

Gonna be another Sunday post. I was up forty hours before my last night's sleep and I feel like going to bed instead of finishing this up tonight. Sorry folks!