July 22, 2013
The ABC of it: Why Children's books matter
Attention everyone in the NYC area! The New York Public library has launched an exhibit on the history of children's books and their illustrations at its main branch in Bryant Park. Many of the items on display are pulled directly from the library's fantastic collection of rare books and artwork, providing a glimpse at some of the delicate and irreplaceable tomes which are usually locked away in a climate controlled vault.
I loved this show (despite the absence of a few of my favorite artists), and will definitely be returning a few times before it closes next March. The curator, Leonard S. Marcus, does an admirable job of tackling such a sprawling subject in a way that is visually interesting to both adults and small children. There are picture books from Brazil, comics from India, and a few hilariously moralistic tomes from the early days of print. There is original art by Sir John Tenniel (Alice in Wonderland), and W.W. Denslow (The Wizard of Oz), as well as real-world artifacts that appear in famous stories- the stuffed animals that inspired the Winnie the Pooh stories, and P.L. Travers' parrot handle umbrella (Mary Poppins had one of a similar design). The show touches on some interesting ideas, such as the influence of Eastern art on Western illustration (and vice versa), or the way children's books in the 1950's and 60's adapted to be in direct competition with comics (which were the scourge of librarians at the time). It left me wishing the show was large enough to warrant an in-depth exhibition catalog!
There are a handful of comics included in the exhibition, but I had mixed feelings about the way they were presented. I don't know that I would classify Blankets as a children's book, and Will Eisner's Contract with God is definitely aimed at an older, more sophisticated, audience. But I'm glad to see that comics were represented, and I enjoyed the novelty of seeing a paperback copy of Blankets in a formidable glass display case next to a Hokusai manga from 1817.
This exhibit made me want to see a deeper exploration of the role of comics in the children's market.
And while it's true that many comics aimed at children or young adults lack the literary recognition and critical acclaim achieved by some the books featured in this exhibit, that is certain to change soon. New Yorker editor Francoise Mouly has started a much-lauded imprint dedicated to comics for children, and you couldn't hope for a better literary pedigree than that.
So definitely see the show! It's free, it's air conditioned, and there are several shelves of books to read as part of the exhibit. And if any of you attend, I'd love to hear your opinions on the show in general, and the presentation of comics in particular!
July 12, 2013
How to Scan Your Comics - Part 1
For part one, I'm going to start with the basics: scanning black and white line art to create a bitmap for black and white reproduction.
A bitmap has only two color settings, black, and white. You may be thinking, "great! my drawing has only two colors, black and white", but the transition from paper to print isn't always that straightforward. You know all those photographs of movie stars with alarmingly sheer black shirts on? Well that shirt probably looked opaque until someone shined a very bright light on it. A similar principle is at work with your scanner. That scanner can only see your image as it looks when a very bright light is shining on it, and this light will highlight any inconsistencies in the thickness of your ink, creating mottled patches in areas that should be all black. Your goal is to take your scanned greyscale image, and decide which of those grey pixels should be white, and which be black.
For this example, I have chosen an antique image which is tiny, dark, and complicated, which will require a bit of fiddling before it looks good (as you'll see below).
It is possible to scan directly to bitmap - plenty of artists do, but you run the risk of losing a lot of detail. In a direct-to-bitmap scan, you are allowing the scanner to make artistic decisions for you. I tried it with the image at left, and this was the result- not exactly ideal.
Your minimum print resolution for line art should be between 1000 and 2000 DPI. 1200 is standard, 800 is doable, but at that point some eagle eyed readers will start seeing pixels.
So erase your pencils, dust off your art, and prep your scanner. I don't want to make any extra work for myself, so I remove any dust or fingerprints on the glass with a lens cloth (an old t-shirt will work in a pinch), or blast it with a bit of compressed air. If the scanner bed is really dirty, it can be cleaned with a tiny bit of rubbing alcohol on a low-lint cloth.
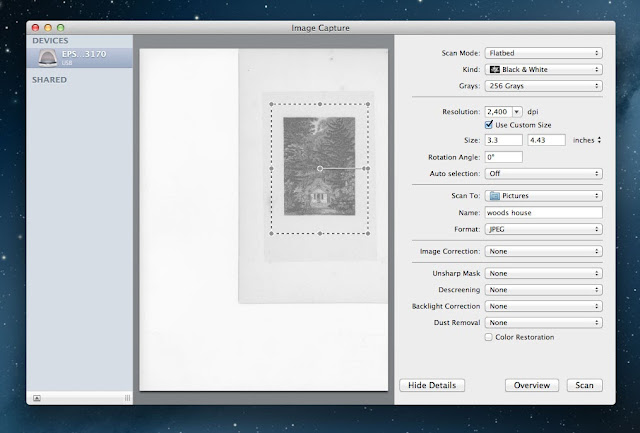
You'll want to scan in grayscale at highest DPI your computer can manage- preferably a bit higher then your final print resolution. Through trial and error, I eventually settled on 2,400 DPI for most images, but that's because I'm a maniac with a pile of external hard drives to store all my massive files. If you're reproducing your artwork at a 1:1 ratio, then can scan directly to your desired print resolution, but often the print size is going to be smaller than the actual artwork, and you can eek by with less. Make sure your scanner is set to jpeg, the scanner was designed primarily for photographers, and will default to the much larger TIFF file if I'm not paying attention.

As you can see, my scanned image came out much murkier than the original.
 |
| scan |
 |
| photograph of original image |
Now that you've scanned your images; I want you to stop, put down the stylus, and save yourself a new version of the file (I usually label them "scan" and "edit").
In fact, if you are in the midst of scanning the masterwork that took you 3 years to write and 8 years to draw, pause now and burn a bunch of CDs to mail to trusted friends (then repeat this process again with the final print files). Everyone has a hard drive horror story, and you'll be glad to have the extra backups if your hard drive expires after you've sold half of the original pages.
Now, open your duplicate copy in Photoshop, and make sure it's still in grayscale.
For this time I am working entirely with levels, so hit command+L to bring up the adjustment panel, and start nudging the black and white arrows closer to each other. Start with very small adjustments, zooming in and out as you go.
 |
| Screenshots of the work in progress, click to enlarge |
At a certain point, those minor adjustments will become almost imperceptible on your screen, and at that point you can start getting more bold, and really move those sliders around.
When you are happy with the result, SAVE it, and re-size the image to your desired print size and resolution by going to "Image" > "Image size". Here I decided on around 8"x11" at 1,600 DPI. Leave the "resample" drop down alone for now, we'll revisit that later.
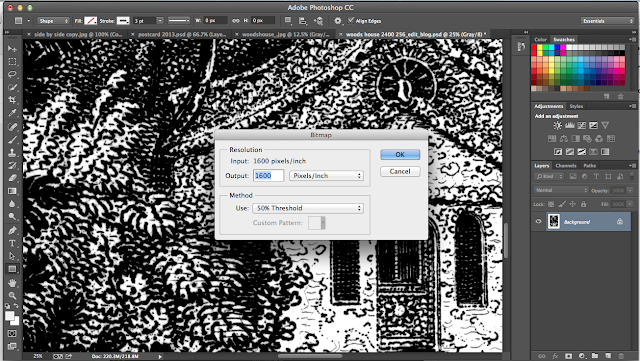
Once your image is the appropriate size you can convert it to a bitmap. Go to "Image" > "Mode" > "Bitmap", and the output settings in the dialog box should already match the resolution of your jpeg. Not click on the "Method" dropdown menu and select "50% Threshold". Hit ok, SAVE your bitmap and you're done!

click to enlarge the images below.
July 11, 2013
Website redesign, plus new URL!
We're back!
I've spent the last few weeks tinkering with the website- changing the color scheme, putting up a new header, and shifting the whole thing over to a new url: www.comic-tools.com.
Feed settings should stay the same, but please let me know if you have any issues!
I will be back later this morning with an introduction to scanning your artwork for print.
Subscribe to:
Posts (Atom)


