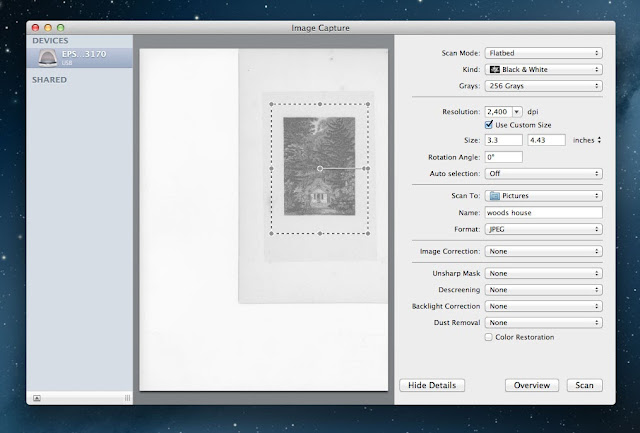
For part one, I'm going to start with the basics: scanning black and white line art to create a bitmap for black and white reproduction.
A bitmap has only two color settings, black, and white. You may be thinking, "great! my drawing has only two colors, black and white", but the transition from paper to print isn't always that straightforward. You know all those photographs of movie stars with alarmingly sheer black shirts on? Well that shirt probably looked opaque until someone shined a very bright light on it. A similar principle is at work with your scanner. That scanner can only see your image as it looks when a very bright light is shining on it, and this light will highlight any inconsistencies in the thickness of your ink, creating mottled patches in areas that should be all black. Your goal is to take your scanned greyscale image, and decide which of those grey pixels should be white, and which be black.
For this example, I have chosen an antique image which is tiny, dark, and complicated, which will require a bit of fiddling before it looks good (as you'll see below).
It is possible to scan directly to bitmap - plenty of artists do, but you run the risk of losing a lot of detail. In a direct-to-bitmap scan, you are allowing the scanner to make artistic decisions for you. I tried it with the image at left, and this was the result- not exactly ideal.
Your minimum print resolution for line art should be between 1000 and 2000 DPI. 1200 is standard, 800 is doable, but at that point some eagle eyed readers will start seeing pixels.
So erase your pencils, dust off your art, and prep your scanner. I don't want to make any extra work for myself, so I remove any dust or fingerprints on the glass with a lens cloth (an old t-shirt will work in a pinch), or blast it with a bit of compressed air. If the scanner bed is really dirty, it can be cleaned with a tiny bit of rubbing alcohol on a low-lint cloth.
You'll want to scan in grayscale at highest DPI your computer can manage- preferably a bit higher then your final print resolution. Through trial and error, I eventually settled on 2,400 DPI for most images, but that's because I'm a maniac with a pile of external hard drives to store all my massive files. If you're reproducing your artwork at a 1:1 ratio, then can scan directly to your desired print resolution, but often the print size is going to be smaller than the actual artwork, and you can eek by with less. Make sure your scanner is set to jpeg, the scanner was designed primarily for photographers, and will default to the much larger TIFF file if I'm not paying attention.

As you can see, my scanned image came out much murkier than the original.
 |
| scan |
 |
| photograph of original image |
Now that you've scanned your images; I want you to stop, put down the stylus, and save yourself a new version of the file (I usually label them "scan" and "edit").
In fact, if you are in the midst of scanning the masterwork that took you 3 years to write and 8 years to draw, pause now and burn a bunch of CDs to mail to trusted friends (then repeat this process again with the final print files). Everyone has a hard drive horror story, and you'll be glad to have the extra backups if your hard drive expires after you've sold half of the original pages.
Now, open your duplicate copy in Photoshop, and make sure it's still in grayscale.
For this time I am working entirely with levels, so hit command+L to bring up the adjustment panel, and start nudging the black and white arrows closer to each other. Start with very small adjustments, zooming in and out as you go.
 |
| Screenshots of the work in progress, click to enlarge |
At a certain point, those minor adjustments will become almost imperceptible on your screen, and at that point you can start getting more bold, and really move those sliders around.
When you are happy with the result, SAVE it, and re-size the image to your desired print size and resolution by going to "Image" > "Image size". Here I decided on around 8"x11" at 1,600 DPI. Leave the "resample" drop down alone for now, we'll revisit that later.
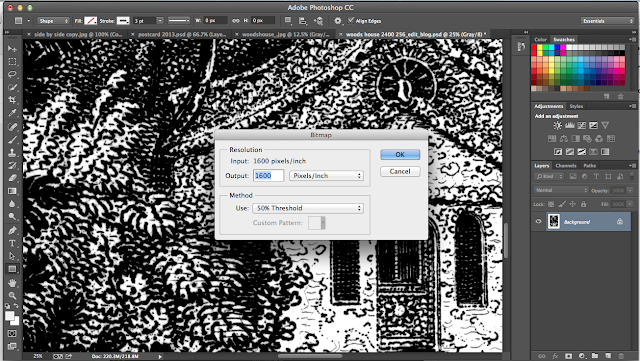
Once your image is the appropriate size you can convert it to a bitmap. Go to "Image" > "Mode" > "Bitmap", and the output settings in the dialog box should already match the resolution of your jpeg. Not click on the "Method" dropdown menu and select "50% Threshold". Hit ok, SAVE your bitmap and you're done!

click to enlarge the images below.


9 comments:
Good idea for a tutorial, scanning a black-and-white sketches always makes some unexpected problems;)
DPI is always a tricky thing. I've found it really hard to pick out the individual pixels at 300 DPI without any magnification. 600-800 DPI is good if you're going with straight line art on good paper (though I know some people swear you need to go at least 1,200 DPI for those instances.) But if you're getting involved with half toning then the calculations change entirely. And for the web? Oy.
But meant to say great to see the blog back and a great first return post!
Great useful post, and nice to see you posting again.
Great to see you back!!!!!!!! I wonder if you could talk a bit more about the scanner itself, why you chose it, etc. I'm looking for a large format scanner 11x17 pages, which is probably what you're working with too. Also a printer that can handle illustration board.
This is very helpful. Thanks!!
So is It better to set the scanner to save the file as JPEG or as a PDF?
Will scans works for colourful paintings too?
Thank you
Awaitinf reply
JPG. There's not really any way to work on a PDF.
Oh, and color art is totally different.
Post a Comment